17 Jun 2020
For me, WebGL as always been something that sounds exciting, but in reality never find a use for. Here I try to summarize the basics.
WebGL is basically a version of OpenGL that runs in the browser. It starts with you creating a canvas element in your DOM, and then initialize a WebGL context on it. Much like how most OpenGL programs are written in C/C++, you write all your WebGL method calls in Javascript, which accesses the underlying WebGL state machine. This is a great illustration of how it works under the hood, and is also a great way to visualize how OpenGL and graphics programming work in general.
From GPU to Screen
At a very simple level, a GPU takes in data about vertices, run that through the vertex shader to output vertices that should be somewhere in your canvas; then for every pixel/fragment (not interchangeable but conceptually similar) on the canvas, it runs through the fragment shader to get an output color. Therefore, vertex shader and fragment shader are the two programs that actually gets executed on the GPU. in WebGL, you give javascript these two programs usually in the form of a String object, which gets compiled and linked by the CPU, and then loaded to the GPU. WebGL2 adds support for Compute Shaders, which can operate on other things besides vertices and fragments, and this project has some interesting showcases of projects using Compute Shader.
Limitations
Recent GPU advancements have been orders of magnitude faster than CPU, but few has adopted WebGL in production websites. I think the main limitations are Inter-operability and ease of development. The most annoying thing is that your WebGL rendering is limited to be on the canvas, and inside the canvas you do not get any information about the outside world, like how other HTML elements are rendered and aligned, or even get input from the user. You have to manually work with the communication between the two, and it can be quite frustrating because we are used to letting the browser handle how the DOM is rendered, and suddenly we need to be a lot more specific about alignment and positioning if we don’t want responsive layout to mess up your WebGL graphics. You also have to work with lack of native debugging and the different syntax of WebGL programs, and the performance benefits are only apparent when you are operating on large enough data that the overhead of compiling WebGL programs and loading data to GPU becomes insignificant.
Frameworks
If you want to take the abstraction up a level, we have Three.js, which is a nice middle-ground between writing OpenGL method calls and using a full Game Engine. It handles basic geometry and simple shaders for you so you can write most things in Javascript. Traditional game engines like Unity also has support for WebGL, but then you are completely leaving the realm of web programming.
01 Jun 2020
Prototypes are usually seen when a module is exporting some functions, it would sometimes add that function using module.prototype.newfunc = . So what is prototype?
Prototype is, at a very high level, the constructor in normal OOP concepts. Every new instance of this Object would have the methods and properties defined in the prototype. Since real constructors are seldom used in JS, the example by w3schools.com is very useful:
function Person(first, last, age, eyecolor) {
  this.firstName = first;
  this.lastName = last;
  this.age = age;
  this.eyeColor = eyecolor;
}

var myFather = new Person("John", "Doe", 50, "blue");
var myMother = new Person("Sally", "Rally", 48, "green");
As if this meld of constructor and the constructed object is not crazy enough, you can then get the prototype property to modify the constructor in runtime:
Person.prototype.nationality = "English";
Then every (existing) Person would also have the nationality property. You can even get a reference to the underlying prototype object and replace it:
// from javascriptweblog.wordpress.com
var a = {};
a.__proto__ = Array.prototype;
a.length;   //-> 0
but there is a difference between .prototype and __proto__, in that if you assign .prototype to a new thing, existing objects won’t get updated, whereas __proto__ would.
This kinda shows an extremely loose definition of inheritance, but allow for much greater freedom, and confusion.
28 May 2020
Working through the Google codelabs tutorials, I am learning the basics about Android. It’s interesting to see how tightly coupled the app development process is with the underlying operating system, something that desktop development would never experience. I feel like I still don’t know enough about the strange syntaxes of Kotlin. Seems like a lot of method calls are used contextually, like cancelAll() just works because it’s inside a NotificationManager. This is surely easy to use, but it might be difficult to tell where the method definition comes from at a glance.
Intent
Intent is basically an entry point to your app, that captures the Application Context, and a specific Activity that this intent will launch. A PendingIntent will allow other applications or the OS to trigger your app, even if your app is not running. A Broadcast is a special Intent that mirror the pub-sub design pattern, and you can have BroadcastReceiver that process the incoming Intent.
Fragment
Fragment is basically a view, and the things that need to be started when running the view, such as creating a Notification Channel to send notifications, initialize a ViewModel to store UI data and such.
ViewModel
ViewModel serves to separate data from the UI. Since the UI might get redrawn because of screen-rotation, split-screen and such, we don’t want to lose the user entered data when that happens. ViewModel helps store that data.
Strings
No strings that show up in the UI should be in the code. The standard android pattern stores all the strings in a separate file, and retrieve them in code by applicationContext.getString(R.string.something). This allows easy translation and changes to wording, since they are all centralized.
25 May 2020
Years ago I found this post about human color perception and computer colors, which I found super helpful in understanding what gamut, sRGB, gamma and such actually mean. Here I try to summarize the main points.
Human Eyes are terrible
We often say that red, green and blue are the three primary colors, and our eyes also function in a similar way. Unfortunately, the cones in our eyes does not have a perfect distribution of sensitivities to detect the three colors.
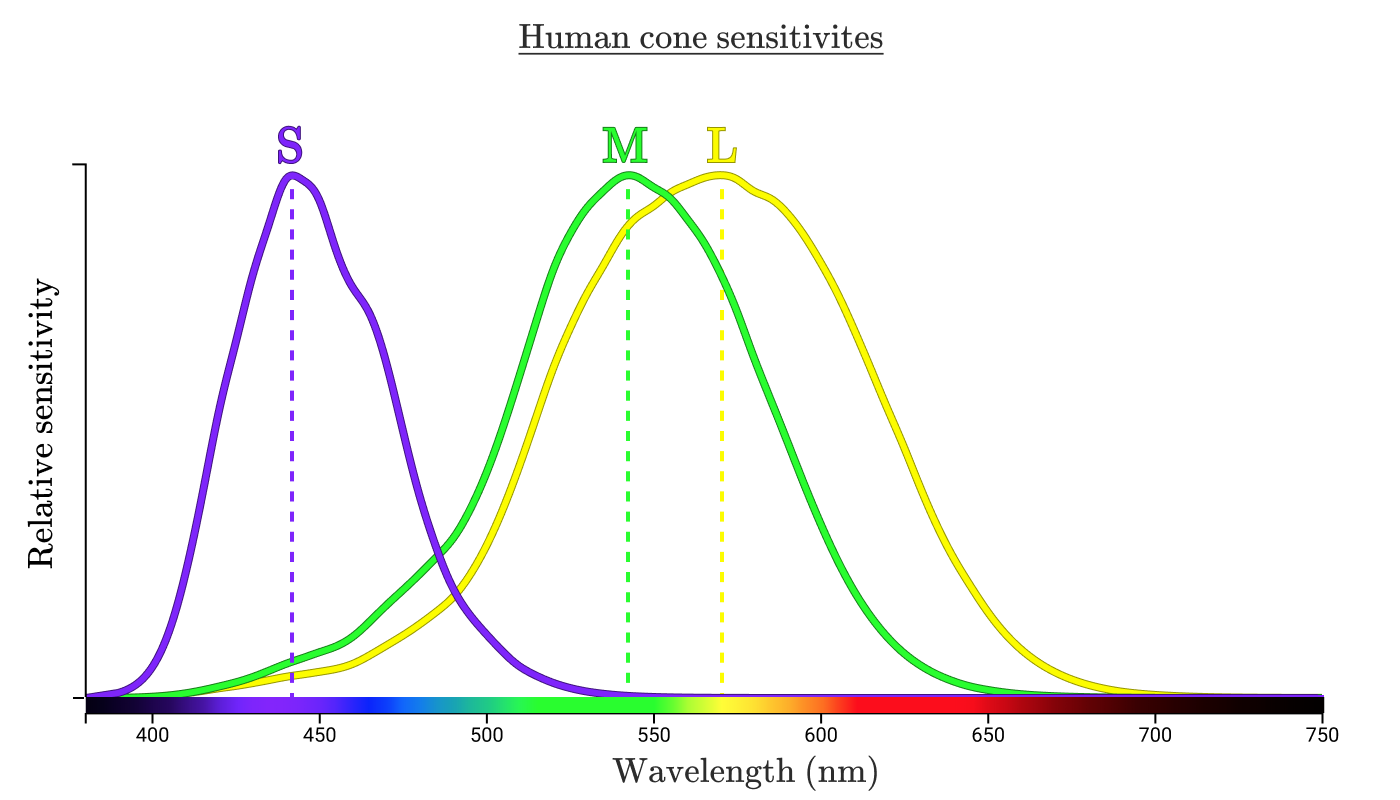
As shown in the diagram, we use SML to label the 3 types of cones in our eyes, and the M & L cones have significant overlap. In theory, we can use (S, M, L) to define any color on the horizontal line, called spectral colors, that we can perceive. This is called the LMS color space.
Color Matching
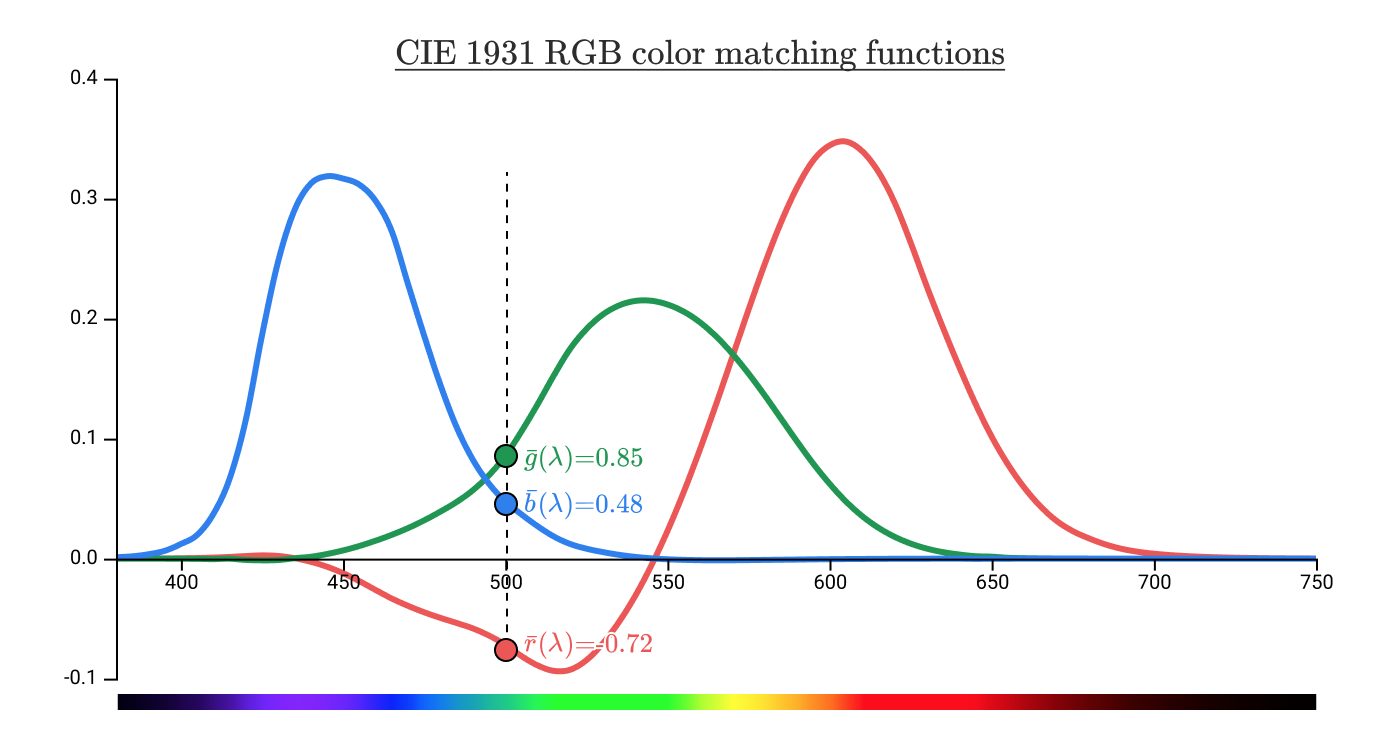
The problem comes when we try to use a combination of Red, Green and Blue light to reproduce a spectral color we can see. Scientists in 1920s decided on some wavelengths of Red, Green and Blue, shined a combination of them on one side, and a pure color wavelength on another side, and adjusted the combination until they look identical. Because of the large overlap between the M & L cones, we cannot produce green without unwanted stimulations to the Red cones. By experiment, they found that a lot of the cyan and blue cannot be reproduced unless we add red to the other side, meaning that we added negative amount of red to our mix of colors.
Scientists then transformed this plot to put the intensities of RGB on the axis. To avoid having to make a 3D plot, they fixed the resulting color’s intensity so that Blue is always (1 - Red - Green) / intensity. Then we can have a 2D plot showing all the possible colors of a certain intensity. This also has the added benefit that we are no longer limited by spectral colors, and can represent colors which is produced by combination of multiple frequencies, such as pink.
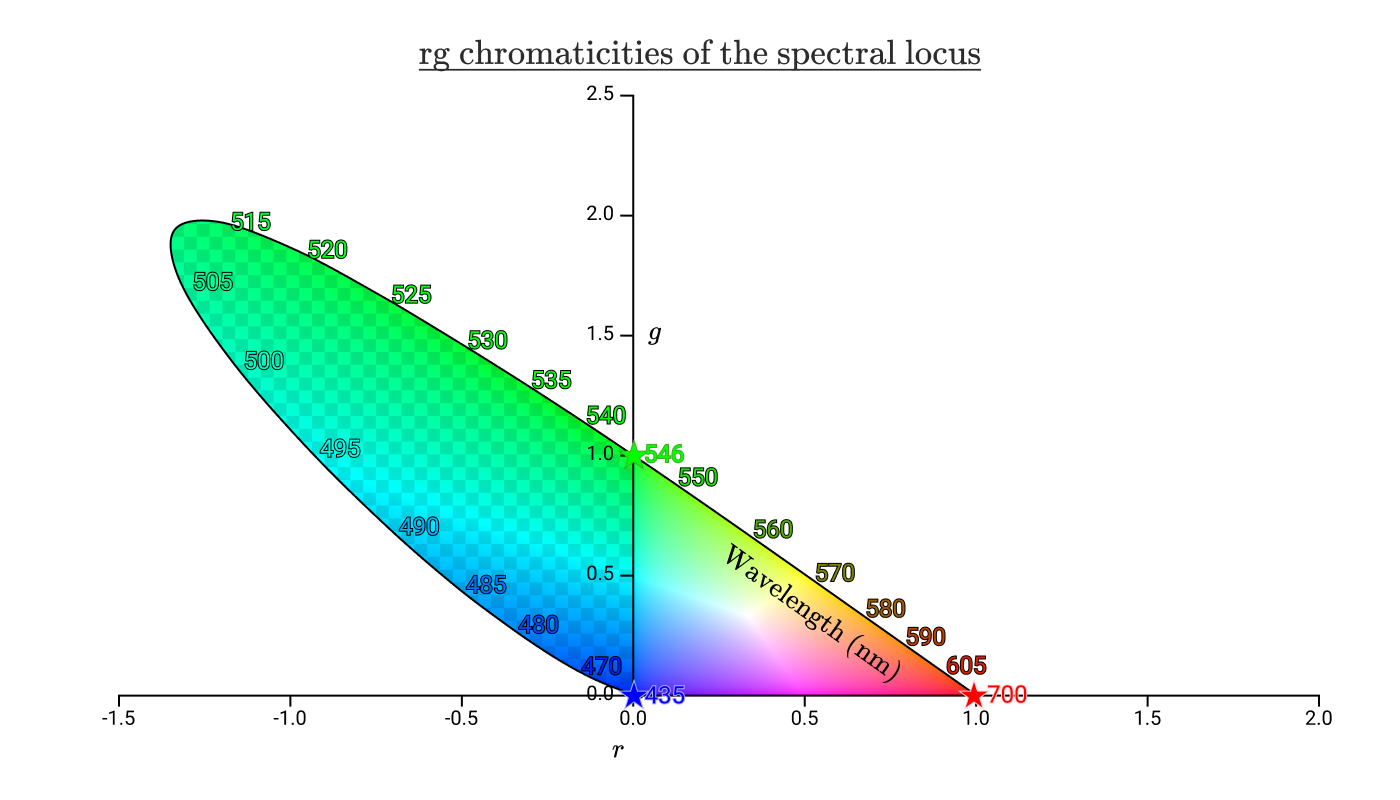
We can still see the area where we would need to add negative amount of red light to reproduce, and now this looks similar to the color space plots we see. Since the scientists in 1931 didn’t like negative numbers, they used a matrix transformation to put the entire area in the positive region. This unfortunately removed the axes’ original association with RGB, and is now called XYZ.
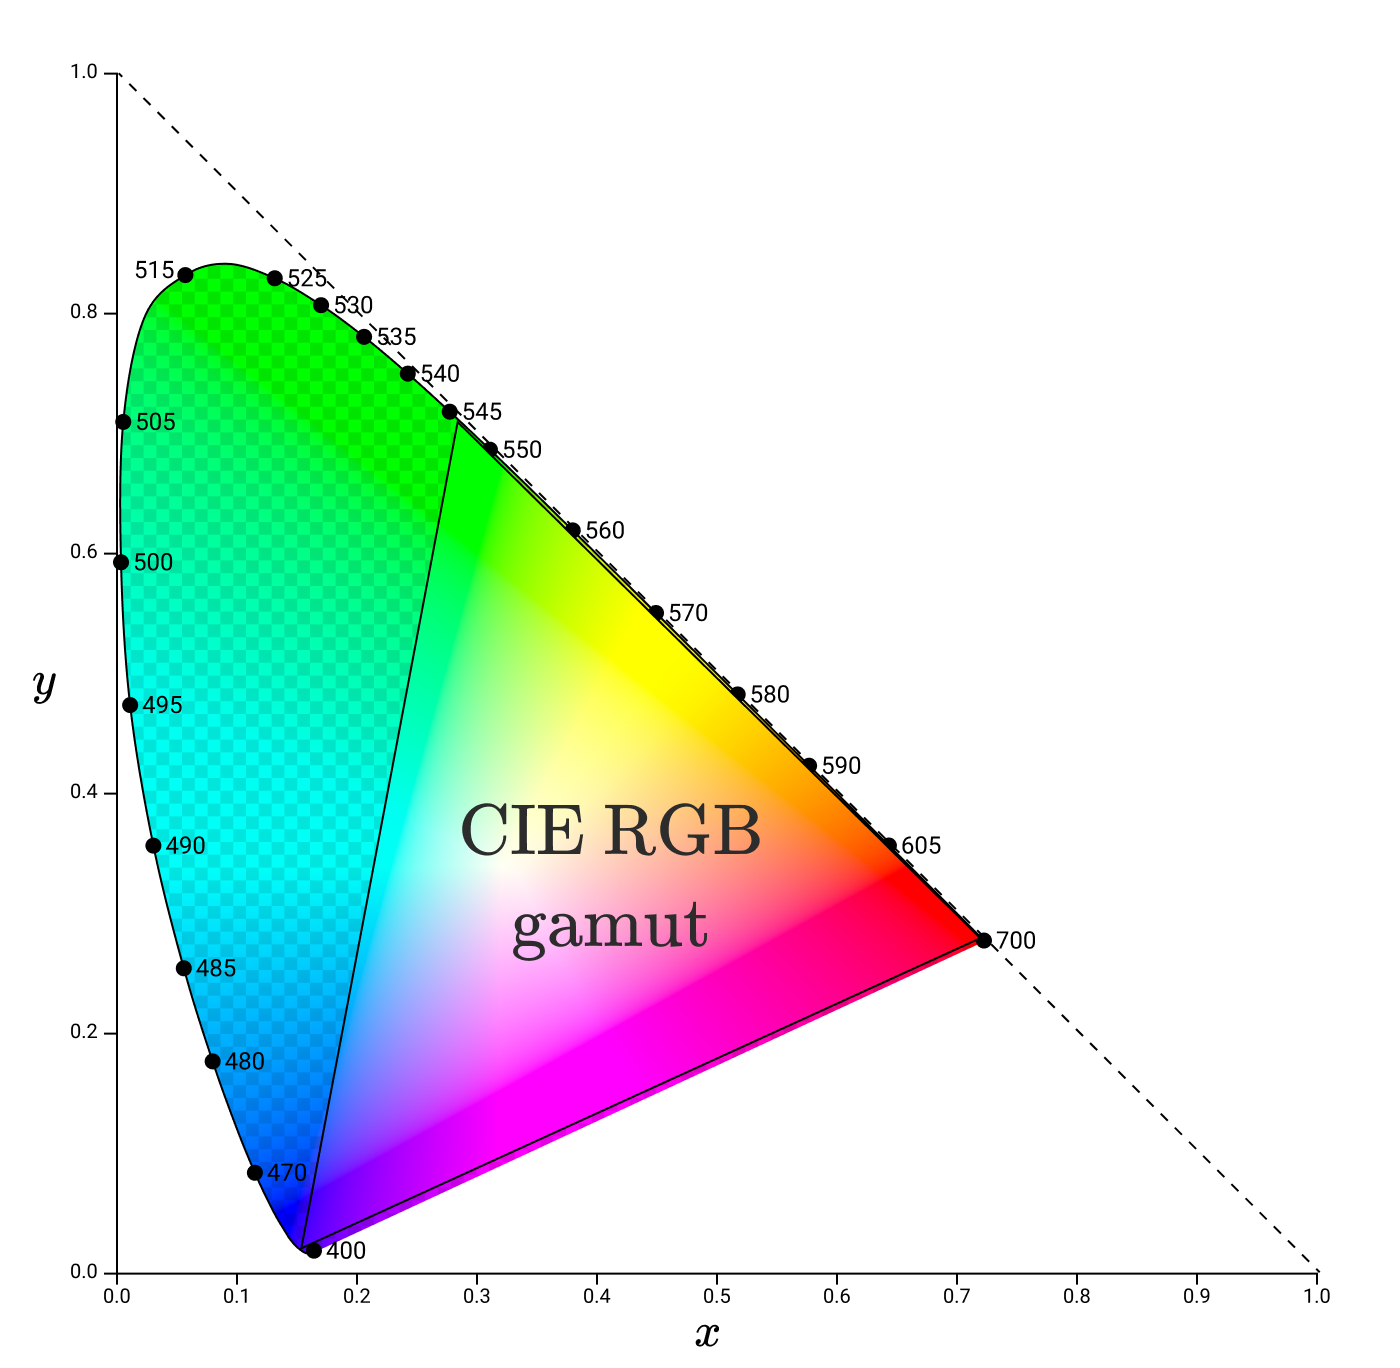
Subsequently, all the sRGB, Adobe RGB, Rec. 709 color spaces can be shown as some area in this plot, while your color lasers will be somewhere at the perimeter of the plot, depending on its color. When we want to reproduce a color using RGB, we can read a point on the plot and get the (R, G, B) values of it.
Gamma
But the story is not over. We still haven’t solved the intensity problem, because the plot only show colors at a fixed intensity. Here’s where our eyes come in again. We are way more sensitive to changes in dim light than in bright light. I guess it has something to do with the cones and rods getting saturated and cannot produce a stronger neural signal. When plotted it would look a power curve, which is exactly what they chose. When we say the standard gamma is around 2.2, we mean that we are mapping the linear intensities to a curve of power 2.2 to make it more linear when perceived.

Color profiles (ICC)
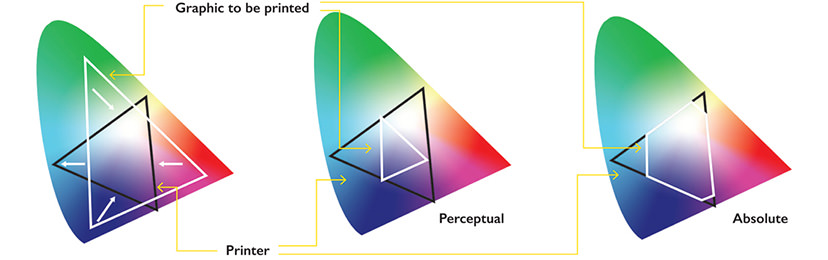
We mentioned color spaces like sRGB and Rec. 709, and we often need to work with a different color space depending on the hardware or specification used. Without some standard way of converting between them, colors would look wildly different across different devices. Here’s where color profiles come in. They define a standard transformation between different color spaces, either by mathematical formulae or by Look Up Tables. These are called mappings, and the same transformation can also have different mappings according to the rendering intent. For example, Relative colorimetric would usually preserve hue and lightness at the cost of saturation (when you transform to a narrower color space, colors may look more muted), while Perceptual is a slightly stylized intent that aims to be pleasing. Here’s a diagram from snapshot:
24 May 2020
Just a quick refresh on css properties related to flex, since the names are often not very descriptive and are easy to forget.
Flex container
A container, as the name suggest, is a base for other things to be aligned / ordered. When you set something with display: flex, this thing becomes a flex container, and elements inside it behave according the flexbox rules. By default, elements inside it line up line-by-line, then row-by-row, like normal characters in a paragraph. This can be controlled with flex-direction, flex-wrap and flex-flow.
Align
But usually, we don’t put enough elements to fill the entire flexbox, hence we need to specify how to align the elements inside. For the container, we can use justify-content to it how to align elements horizontally, and align-items to align elements vertically. This illustration by css-tricks is very clear:
justify-content

align-items

These are calculated for each line in the flexbox. Then align-content would tell the container how to place the lines relative to the whole container. For elements inside the container, we can also use align-self to override the alignment for that item.